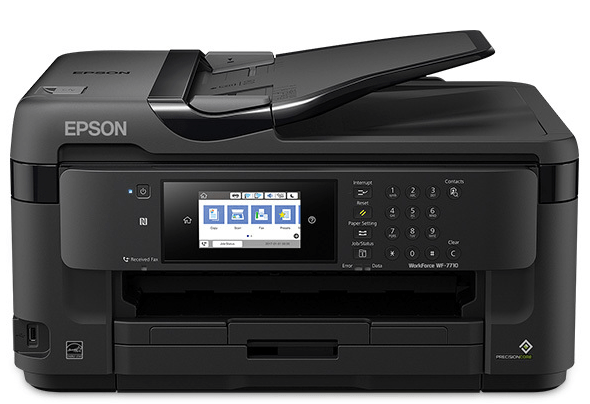
The Epson WorkForce WF-7710 all-in-one is a wide-format printer designed for office use especially. The inkjet printer uses Epson PrecisionCore technology to deliver high performance that can beat laser printers. The Wi-Fi and Wi-Fi Direct connectivity feature of this Epson printer allows you to connect it with multiple wireless devices. Also, this machine supports Ethernet connectivity, which makes it truly versatile for office work environment.
Review: The ADF (Automatic Document Feeder) and auto duplex printing feature in this all-in-one further improves its productivity. For easy navigation and control, this Epson machine is fitted with a 4.3-inch color touchscreen. However, to get the best performance of this Epson multi-function machine you must install it by using its genuine Epson printer drivers. Get this printer from the Amazon Store at a maximum discount.
In this driver download guide, you will find the Epson WorkForce WF-7710 driver download links for the Windows, Mac and Linux operating systems. All the Epson drivers we have shared on this page are genuine and fully compatible with appropriate operating systems. Go to the download section and choose your operating system and click on its download button.
If you want to download any specific Epson driver or software for this device directly from the Epson website, then we have described the process of doing that in the direct download guide given below.
For your convenience, we have also provided installation guides for Epson printer drivers and a setup guide to wirelessly setup this Epson multi-function device with your Wi-Fi router.
Jump to section:
- Driver download section
- How to download drivers directly from Epson’s website
- Installation Guide through USB
- Installation Guide through WiFi
Steps to Download Epson WorkForce WF-7710 Driver
Follow the download steps given below to start the download of your Epson WorkForce WF-7710 driver setup file by using the download links given on this page.
- Find the operating system on our OS list where you want to install your Epson printer.
- Click on the download button associated with your chosen OS version to start the download of your Epson printer driver file.
Driver Download Links
| Driver Description | Download Links |
| Epson WF-7710 driver for Windows XP, Server 2003, 2008 (32bit) | Download (8.41 MB) |
| Epson WF-7710 driver for Windows XP, Server 2003, 2008, 2012, 2016, 2019, 2022 (64bit) | Download (8.28 MB) |
| Epson WF-7710 driver for Windows Vista, 7, 8.1, 10, 11 (32bit/64bit) | Download (12.2 MB) |
| Epson WorkForce WF-7710 driver for Mac OS 11.x, 12.x, 13.x | Download (8.28 MB) |
| Epson WorkForce WF-7710 driver for Mac OS 10.7 to 10.15 | Download (13.7 MB) |
| Epson WorkForce WF-7710 driver for Mac OS 10.6 | Printer Driver (45.4 MB) Scanner Driver (24.2 MB) |
| Epson WorkForce WF-7710 driver for Mac OS 10.5 | Download (24.1 MB) |
| Epson WorkForce WF-7710 driver for Linux and Ubuntu | Not Available |
Steps to download 7710 driver from the Epson website directly
Epson provides a lot of drivers, software, apps, etc. for this Epson WorkForce printer on its website. In case you you were unable to find on this page the driver or software that you were searching for this printer, you can visit the Epson site to get your preferred driver or software. In this download guide, we will describe in simple steps the process to download your preferred driver or software directly from the official Epson website.
On this page, we have shared the full feature of Epson WorkForce WF-7710 software. Therefore, in the below mentioned example, we will describe the download steps of the Epson WorkForce WF-7710 basic driver for Windows 7 (32bit).
- To download the Epson driver and software, visit the Epson WorkForce WF-7710 official website.
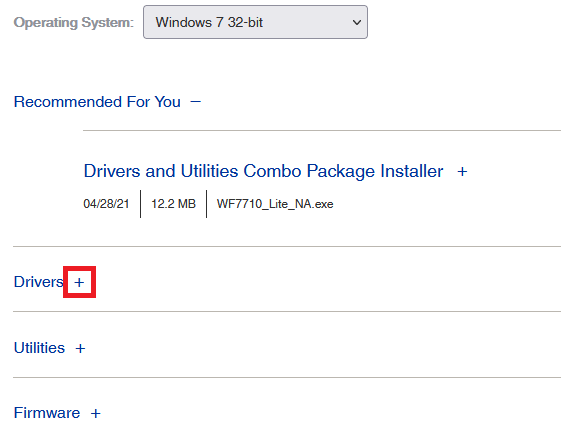
- In front of the operating system field, click the ‘Down’ arrow button to view the list of OS versions supported by this Epson printer. Choose your preferred OS version, we have chosen ‘Windows 7 32-bit’.

select the OS - Click on the ‘GO’ button in front of the OS name, to view the list of drivers and software provided by the Epson for your chosen OS version.

click on go - Since, we want to download the basic driver, click on the ‘Plus’ sign in front of the ‘Drivers’. If you want to download any other software or utility for this Epson device, then you should choose your options accordingly.
click on plus - From the list of available drivers locate ‘Printer Driver’ and click on the ‘Download’ button associated with it.
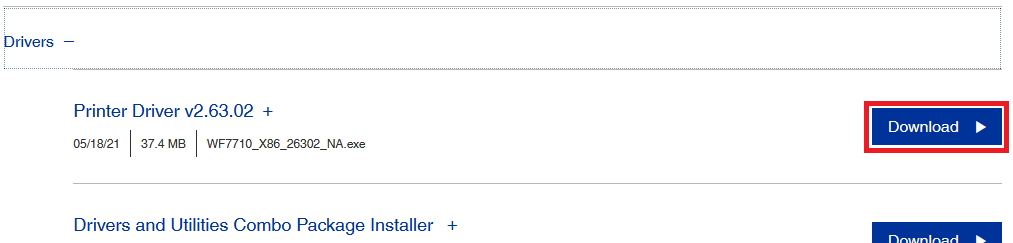
click on download button - Click on the ‘Save File’ button to start the download of your printer driver.

save the epson 7710 printer driver to local drive - You can follow the download steps given above to download any other driver or software from the Epson website. All you have to do is choose your preferred OS version, select the driver or software type and follow the rest of the steps as they have been mentioned above.
How to Install Epson WorkForce WF-7710 Driver
Proper installation of your printer driver is as important as choosing the right driver. Therefore, in this section, we have provided two driver installation guides which clearly describe the right installation method for their respective drivers. The first installation guide describes the installation method for the Epson driver package, while the second guide gives the details to properly install the Epson INF driver. Select the guide according to your driver type and follow its instructions in their correct order to avoid making any printer driver installation mistakes.
1) Install Epson WorkForce WF-7710 Using Driver Package
In this installation guide, we will describe the method to install the Epson WorkForce WF-7710 driver package. The installation steps given below are for the Windows 10 operating system, but you can follow the same steps for other Windows operating systems as well.
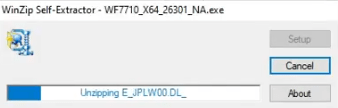
- Double click the Epson driver package and wait for its driver files to extract on your computer.
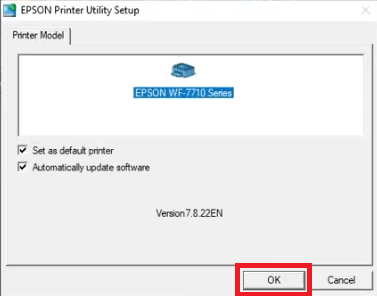
being installed - In the Main Screen, choose ‘Set as default printer’ and ‘Automatically update software’ options, then click on the ‘OK’ button to continue. These options are not mandatory, but it’s recommended to choose them for the proper functioning of your printer.
click on the epson 7710 printer icon - Choose your preferred language and click on the ‘OK’ button to proceed.

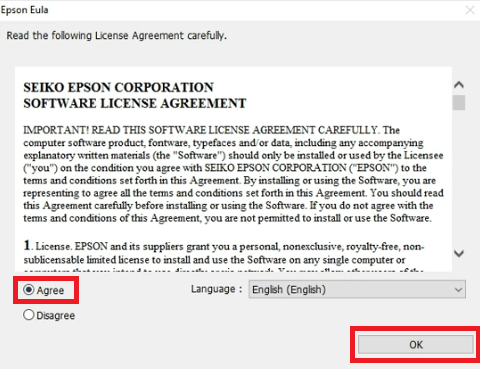
Select language - Select the ‘Agree’ option to accept the license agreement and click on the ‘OK’ button.
click on I agree - Wait for the printer driver to install on your computer.

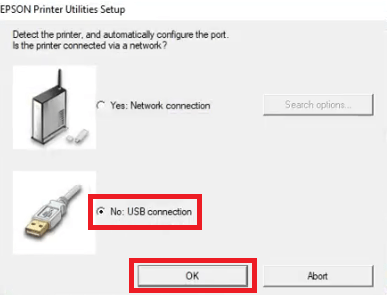
start installing Epson 7710 - In the printer connection option, choose ‘No: USB connection’ for connecting via the USB port. Then, click on the ‘OK’ button to continue.
install through USB - Now, connect your Epson printer to your computer using a USB cable. Wait for the setup to detect your printer and automatically configure the port. You can click on the ‘Manual’ button to manually configure the port, but that’s not recommended.

Epson 7710 printer is being detected - When you see the message that printer installation and port configuration is completed, then click on the ‘OK’ button.
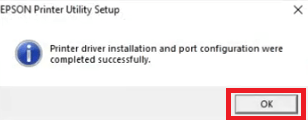
printer installed - That’s it, you have successfully installed the Epson WorkForce WF-7710 printer driver on your Windows 10 computer. Your printer is ready for use and you can send print, scan and copy commands by using the Epson software.
2) Install Epson WorkForce WF-7710 Using INF Driver
Installing a printer using its INF driver file can be a tricky process for many users. Therefore, in the driver installation guide given below, we have described the right method of installing the Epson WorkForce WF-7710 INF driver on a Windows computer. Study our installation guide carefully and follow its instructions as they have been mentioned.
How to install driver manually using basic driver (.INF driver)
How to Setup Epson WorkForce WF-7710 throug Wi-Fi
The Epson WorkForce WF-7710 supports Wi-Fi connectivity features, which means you can easily connect this all-in-one with your existing wireless network via your Wi-Fi router. In this setup guide, we will describe the steps to setup this Epson WorkForce machine with your Wi-Fi router.
Before starting the setup process, you must ensure that your Wi-Fi router is switched-on and your wireless network is properly setup. The steps given below can be used for all Windows operating systems.
- Run the Epson Install Software and accept the license agreement. In the Software Selection screen, make sure all the items are selected, then click on the ‘Install’ button to proceed with the installation process.
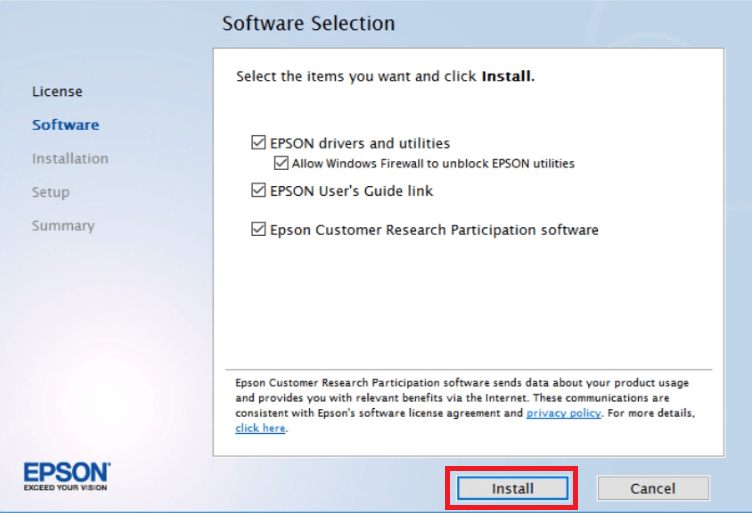
click on install - Wait for the installer to install the Epson drivers and utilities on your computer.

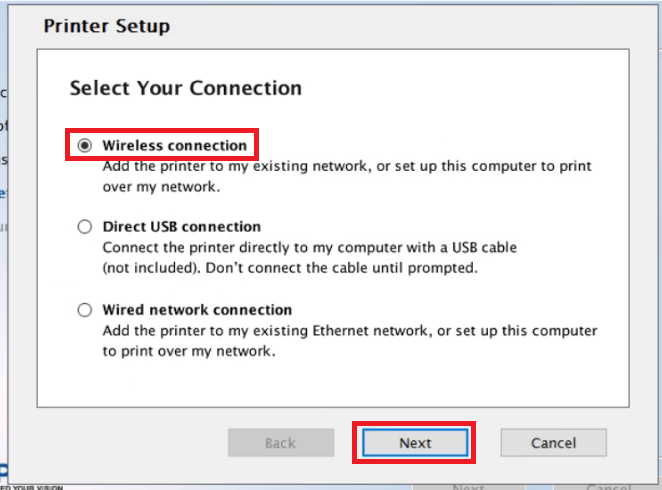
installing Epson 7710 driver - In the Select your Connection window, choose ‘Wireless connection’ and click on the ‘Next’ button to proceed.
select wireless connection option - In the Setup Option window, choose ‘Set up printer for the first time’ option and click on the ‘Next’ button.

Select: First time installation
Now, either the Epson installer will be able to detect your wireless settings or it will fail in doing so. We will consider both of these options in the steps given below. Follow the steps according to the screen that appears on your computer.
a) Installer detects wireless settings
If the installer has detected wireless settings, then follow the steps given below.
- You need to enable Wi-Fi Auto Connect for properly connecting your Epson device to your router. Therefore, choose ‘Yes’ option, then click on ‘Next’ to proceed.

select auto connect option - Follow rest of the on-screen instructions and your printer Wi-Fi setup will be completed successfully.
b) Installer fails to detect the wireless settings
If the installer is unable to detect the setting of your wireless network, then you will have to provide these settings manually. Follow the steps given below to perform this task.
- In the Wireless Network Setup Method screen, choose the ‘Using control panel’ option and click on the ‘Next’ button.

select the option using control panel - Now, you will see the details, like Network Name and Password, of your wireless network. Click on the ‘Show Network Password’ button to view the password.

Show password - Note down the ‘Network Name’ and ‘Network Password’ as you will need them in the future, then click on the ‘Next’ button to proceed.

Show wifi name and password - When the Start Wireless Setup screen appears on your computer, then move to the Epson WorkForce control panel.

start setup from printer display - Press the ‘Home’ button on the control panel of your Epson printer.

- Press the ‘connection settings’ icon on the top of the printer touchscreen.

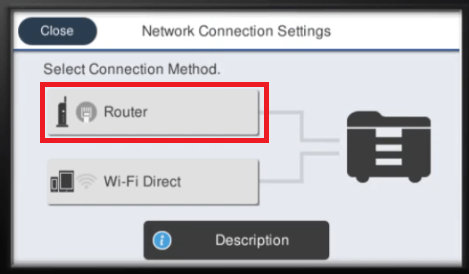
- In the Network Connection Settings, tap on the ‘Router’ option to proceed.
- Press ‘Start Setup’ button to start the wireless connection method.
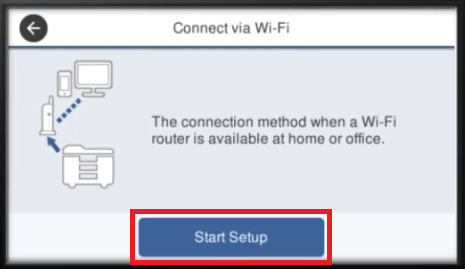
- Choose ‘Wi-Fi Setup Wizard’ option to proceed with the setup.

- Select your wireless network in the list of wireless networks available for connection.

- Tap on the ‘Enter Password’ field to enter your password.
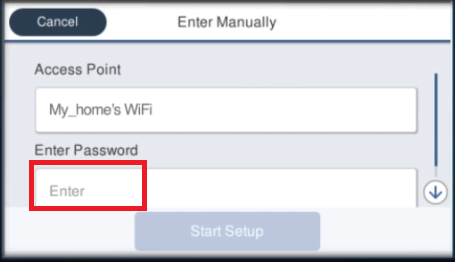
- Enter the ‘Network Password’ (you noted down in Step 3) by using the touchscreen keypad. After entering the password tap on the ‘OK’ button.

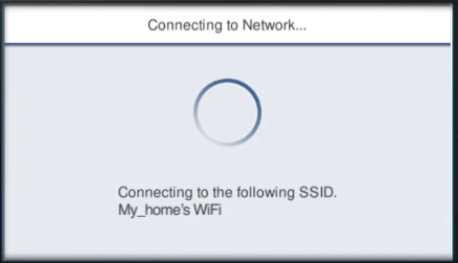
- Tap on the ‘Start Setup’ button to begin the setup process.

- Wait for the printer to connect with the chosen wireless router.
- When ‘Wi-Fi setup is complete‘ message appears, move to the computer screen to proceed with the setup process.

Epson 7710 printer is installed - In the Printer Setup screen, press on the ‘Next’ button and follow the rest of the onscreen instructions to properly setup your Epson WorkForce printer with your Wi-Fi router.

- After the successful setup of your Epson WorkForce WF-7710 printer with your Wi-Fi router, you are now ready to print wirelessly. Now, you can connect one or more wireless devices to your Epson printer via a Wi-Fi network and use them to send print, scan and copy commands to your Epson all-in-one device.
- That’s it, if you get confused at any steps then check out the video tutorial that shows the complete process of how to install Epson WF-7710 printer wirelessly.
Epson WorkForce WF-7710 Ink Cartridge Details
This Epson printer uses one Black, one Cyan, one Magenta and one yellow ink cartridge. The standard Black (T2701), large Black (T2711) and extra-large Black (T2791) ink cartridges can print up to 350 pages, 1100 pages and 2200 pages respectively. The standard Cyan (T2702), Magenta (T2703) and Yellow (T2704) ink cartridges can print nearly 300 pages per cartridge. While the large Cyan (T2712), Magenta (T2713) and Yellow (T2714) ink cartridges can print up to 1100 pages per cartridge. You may get this ink from Amazon store.