
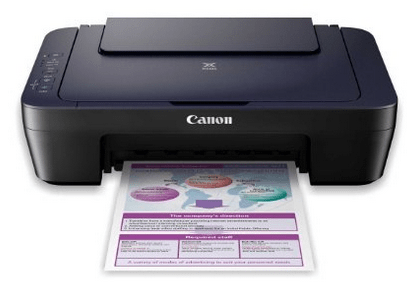
Canon PIXMA E400 Driver Download
for Windows XP, Vista, Windows 7, Windows 8, 8.1, 10, server 32 or 64 Bit, Linux, and Mac
- Canon PIXMA E400 Driver Download
- Canon PIXMA E400 Driver Download Links
- How to download Canon PIXMA E400 Printer Driver.
- Follow the following instructions to download the drivers.
- How To Install Canon E400 Driver Automatically
- Method 1: Using Online Driver
- Method 2: Install Canon e400 using its driver CD
- Method 3: Install the Canon e400 driver by using its Basic Driver
- Canon PIXMA E400 driver compatibility.
- Supported operating systems
- Canon PIXMA E400 uninstallation
- Canon PIXMA E400 Features
- Printer Specification:
- FAQs
- FAQs
Canon PIXMA E400 is an excellent all-in-one that can resolve all your printing issues by offering quality printing and superb performance. Canon e400 Inkjet Printer Driver Download. On this page, we will provide Canon PIXMA E400 driver download links for multiple operating systems Windows XP, 7, 8, 8.1, 10, server, Mac and comprehensive information on how to install them properly.
Canon PIXMA E400 Driver Download Links
Full-featured & Basic driver
- Canon PIXMA E400 Driver Download for Windows XP (32/64bit) – Download
- Canon PIXMA E400 Driver Download for Windows Vista (32/64bit) – Download
- Canon PIXMA E400 Driver Download for Windows 7 (32/64bit) – Download
- Canon PIXMA E400 Driver Download for Windows 8, 8.1 (32/64bit) – Download
- Canon PIXMA E400 Driver Download for Windows 10 (32/64bit) – Download
- Canon PIXMA E400 Driver Download for Windows 11 (32/64bit) – Download
- Canon PIXMA E400 Driver Download for Server 2000 to 2022 – Download
- Canon PIXMA E400 Driver Download for Mac OS X 11.x and 12.x Monterey – Download
- Canon PIXMA E400 Driver Download for Mac OS X 10.6 to v10.15 – Download
- Canon PIXMA E400 Driver Download for Linux and Ubuntu – Download
- Canon PIXMA E400 Driver Download for Android OS (Phone – Mobile) – Download.
OR
- You can download the driver directly from Canon e400 official website.
How to download Canon PIXMA E400 Printer Driver.
- First, recognize the exact version of the operating system on which you will be installing the Canon PIXMA E400 printer.
- Below you will find a list of multiple operating systems supported by Canon PIXMA E400 machine. Select your operating system on that list and download the Canon PIXMA E400 colour printer driver associated with it.
Follow the following instructions to download the drivers.
Step1: First, get the operating system info before downloading the drivers
Before downloading drivers, you need to have the info about your operating system so that you can get the downloaded drivers according to your operating system.
- Get the “Operating system” and “System Architecture (system type)“.
If you don’t know what to do, click here to find out how to find “operating system” and “system type” in computer.
Step2: Download the drivers here
We have listed all the latest drivers for the Canon PIXMA E400 series printer here.
- Below, you can choose your “operating system” and “System Architecture” and then click on their Download link to download drivers.
- Click on the download link and choose where you want to download it on your computer.
- Click Save and wait until the download is complete.
[Steps] How To Install Canon E400 Driver Automatically
Method 1: Using Online Driver
Install Canon e400 printer driver if you have downloaded the driver from the Internet like the one above.
Our experts have prepared a driver installation guide to describe the right procedure for installing our printer drivers. The installation process is short and easy to implement. However, you should read it carefully before executing because the process of installation is different for each operating system.
Follow the following instructions:
- Double click on the Driver package of your choice after it’s downloaded. The installation will extract the files required to begin.

- The installation will now begin, so walk the Wizard prompts to install the drivers.

- Accept the Installation Agreement.

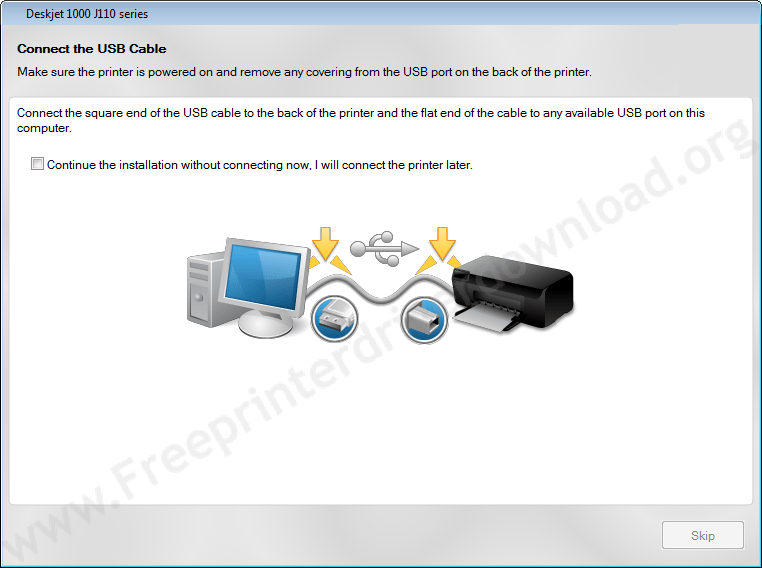
- Connect your printer to your computer when prompted to do so. (See below screenshot)
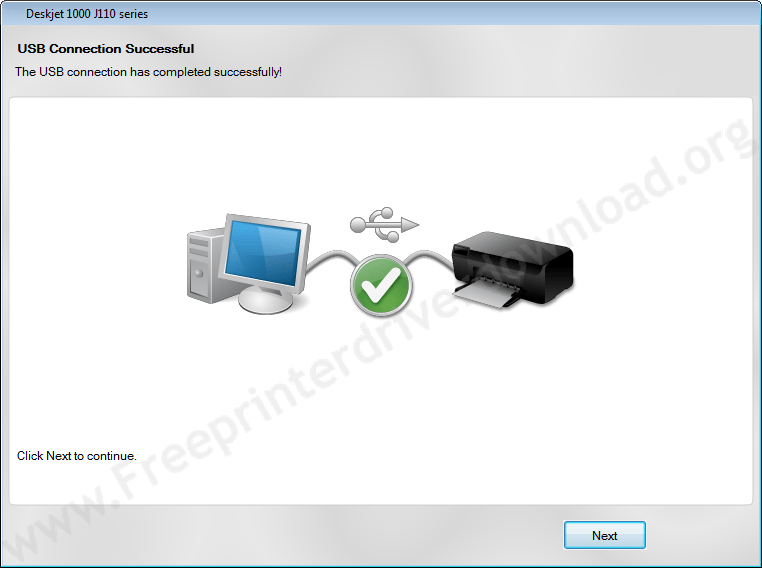
- Wait until detecting your printer.

- Click on Next, now your printer is detected here if you get green tick mark.
- Click on Finish to complete the installation.
Additional details:
Install the drivers for the Canon PIXMA E400 printer with its installation package:
You can install printer drivers even if you have lost your printer drivers CD. This is the method that you can install Canon PIXMA E400 printer without CD (disc).
Method1: to download driver
- Go to Canon PIXMA E400 official website and click on the Download drivers button.
- Enter your printer name in the Find My Product box.
- A series of results will appear, so make sure you select your specific printer model by clicking on it
- Choose your operating system that matches your version of Windows.
- Choose either the Basic Driver or Full Feature Driver. The Basic Driver package includes all the basic files required to use the printer. The Full Feature package includes extra software, such as maintenance programs, utilities, and even photo editing apps.
Method2: to download driver:
You can download the driver directly: Driver Download links are also given on this page, you can download it from here directly. Scroll above to find the driver download link.
Then follow the below-given instructions to install Canon PIXMA E400 driver:
- Click on the driver package and choose where you want to download it on your computer.
- Click Save and wait until the download is complete.
- Double click on the Driver package of your choice after it’s downloaded. The installation will extract the files required to begin.
- The installation will now begin, so walk the Wizard prompts to install the drivers.
- Accept Installation agreements.
- Connect your printer to your computer when prompted to do so.
- Click Finish to finish installing the drivers.
Method 2: Install Canon e400 using its driver CD
Install Canon e400 printer driver if you have its driver CD that came with the printer.
- Turn on the printer by pressing the power button on it.
- Load the driver CD that came with your printer into your computer’s CD drive.
- The AutoPlay window will pop up and prompt you to Install or run a program from your media.
- Click on Run or execute the file named Autorun.exe.
- Windows will ask you if you want to open the installer at which point you should click on Yes.
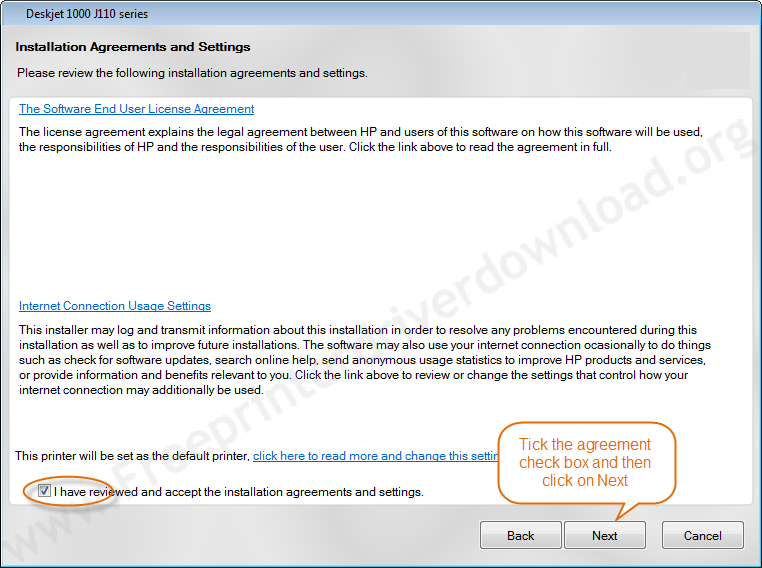
- Before the installation can continue, you need to review the agreements and then click on the checkbox next to “I have reviewed and accepted the installation agreement“.
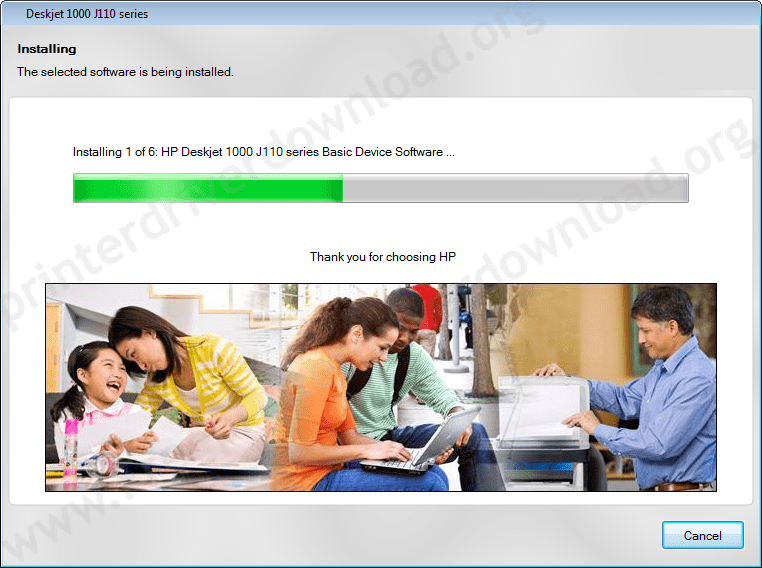
- You’ll now be prompted to click Next to begin installing the Canon PIXMA E400 printer drivers. The Installer will copy files from the CD and transfer them to your computer.
- A menu with a few choices will appear, so make sure you choose the way you want to connect the printer to your computer.
- Choose to either connect it through a wireless network, a wired network or using a USB cable.
- A window will then appear asking that you connect one end of the USB cable into your printer and the other to your laptop/computer.
- Your computer will find the printer (automatically) and then continue/next with the installation.
- Once the installation is complete, the installer will notify you about it.
- A window will appear saying the software was successfully installed, Click Finish.
Method 3: Install the Canon e400 driver by using its Basic Driver
Install the drivers for the Canon PIXMA E400 printer manually by using its basic driver.
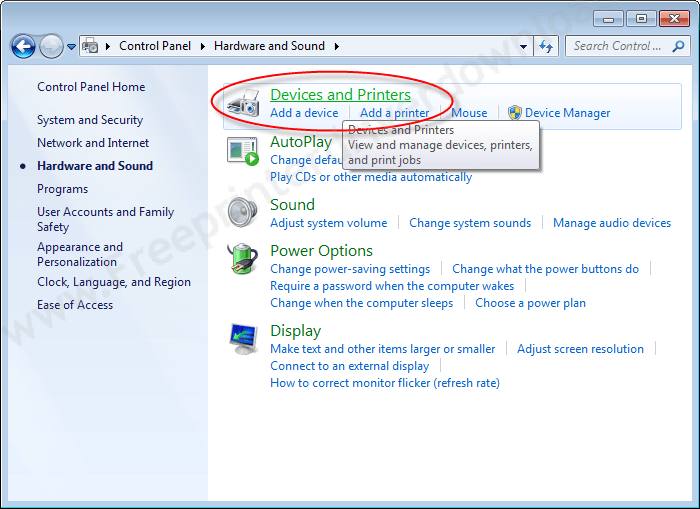
- Go to Start, Locate the Control Panel on the right and click on it.

- Go to Hardware and Sound.
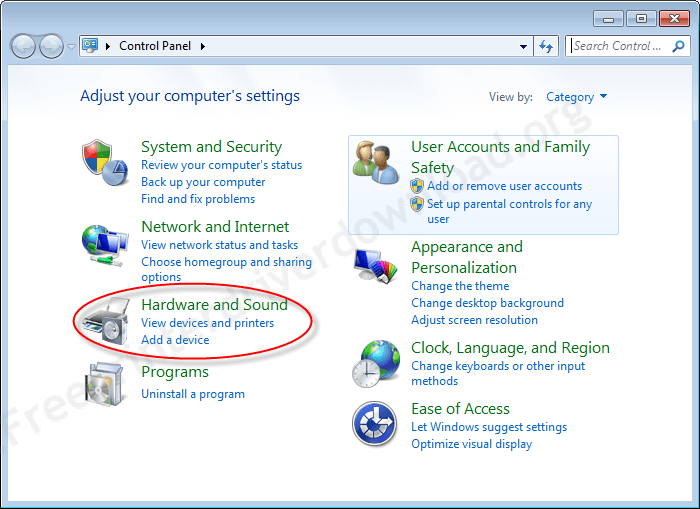
- Under Devices and Printers, click on Add printer.
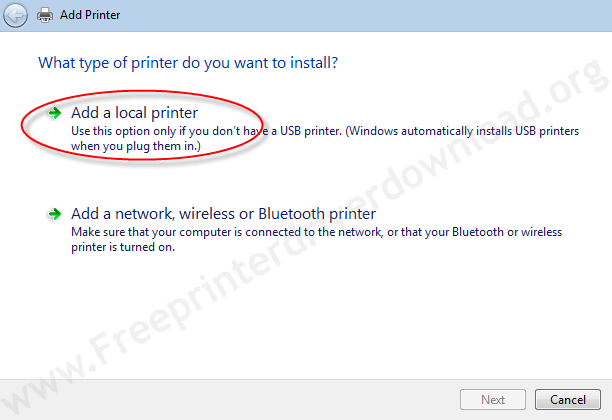
- Choose Add a local printer if you don’t have a USB printer listed in the list. That’s because Windows installs USB printers automatically as you plug them in.

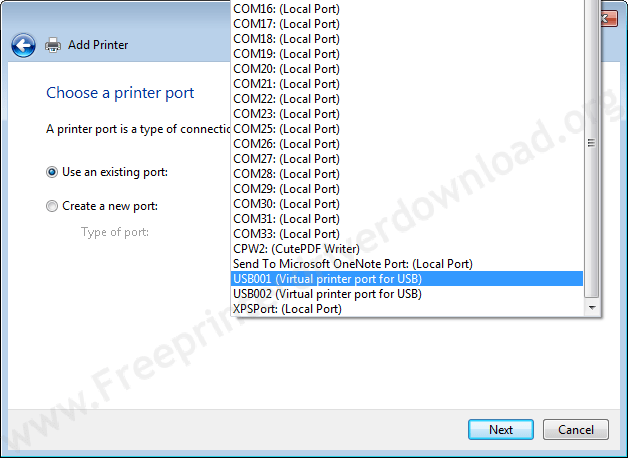
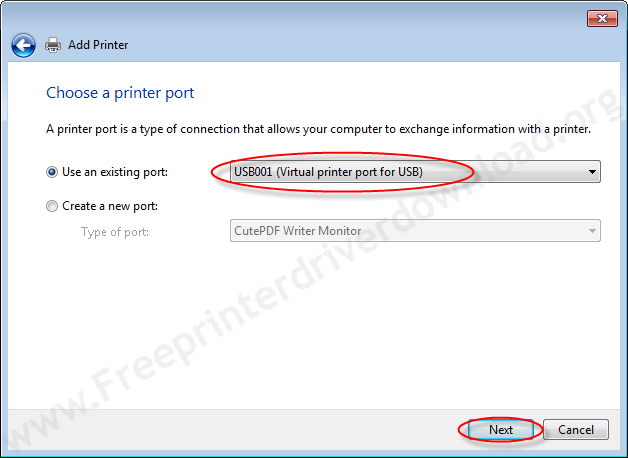
- Choose a port for your printer.
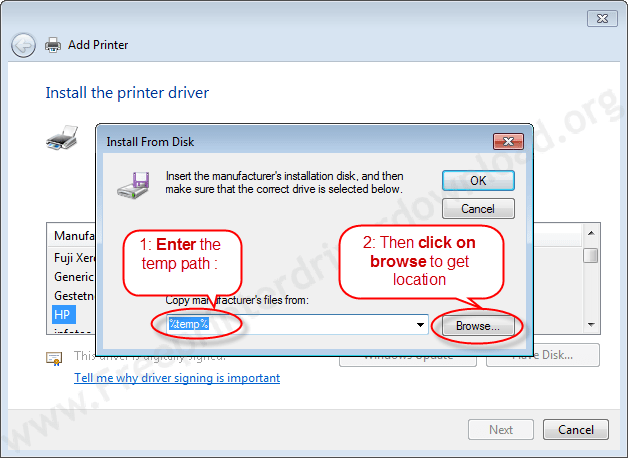
- Choose your printer from the list (including brand and model) and click Next. If you can’t find your printer drivers on this default list then you have to download the drivers first and then extract them from the temp folder then give that temp folder path in this “add a printer” installation wizard. Click on “Have disk” to choose a driver manually from their extracted location.

- Extract printer drivers. Usually, drivers are automatically extracted into the temp folder path: %temp%. Some drivers are automatically extracted in a C drive or another path, depending on the printer brand.
- This printer package extracting the driver’s file in temp folder. Usually, it extracts in temp folder.
- After clicking on “Have disk“, type “%temp%” in path field and then click on “browse“
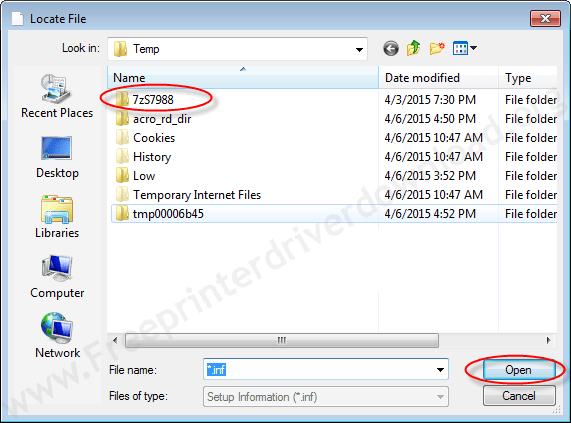
- Browse will bring you to the temp folder. Here, choose the package extracted folder and open it.
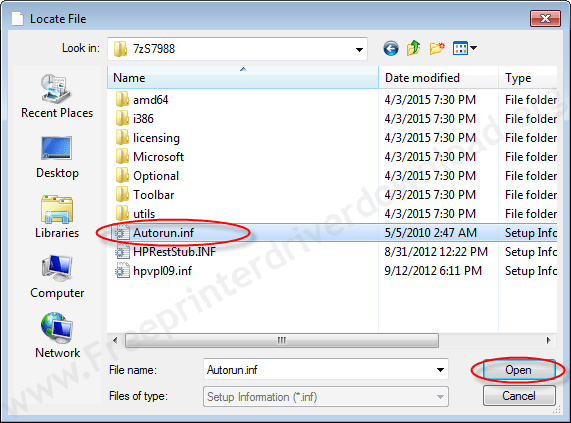
- Now choose the file named “Autorun.inf” and open it. The file name may vary, but the extension should be the same “.inf“.
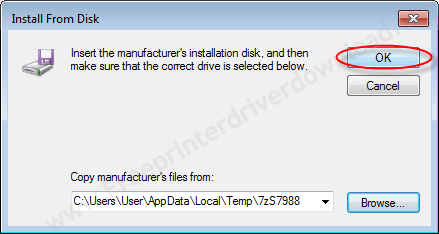
- After clicking on “Open”, you will be brought back to the “Install from disk” menu with the full path. Click on OK now to get the drivers.
- Now, click on NEXT

- If you get the screen below, then you have to choose the second option (replace the current driver)
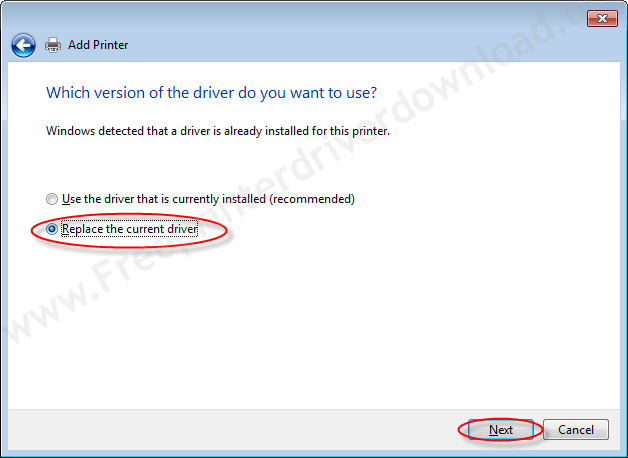
- Click on Next
- Choose the option as per your requirement that you would like to share your printer to another computer or not. Then click on NEXT.

- Choose the option that “set your printer as default” and then click Finish.


Canon PIXMA E400 driver compatibility.
To resolve a common concern of computer users regarding the compatibility of a printer driver we have taken some precautions. Our experts have thoroughly tested all our printer drivers with their associated operating systems and the Canon PIXMA E400 machine. This has been done to ensure that you can install our printer drivers on your computer without worrying about any compatibility issues.
Supported operating systems
Windows XP
Windows Vista
Windows 7 (32bit-64bit)
Windows 8 (32bit-64bit)
Windows 8.1 (32bit-64bit)
Windows 10 (32bit-64bit)
Mac OSX 10.1 or later
Canon PIXMA E400 uninstallation
Some users find it tough to get rid of driver conflicts from their computer. In reality, it’s a simple process which requires you to uninstall all the unnecessary and old drivers from your computer. However, if you can’t do that, then at least ensure that only useful drivers are running on your computer when you are using the Canon PIXMA E400 device.
Canon PIXMA E400 Features
- Canon’s FINE technology. Inkjet printer.
- Print resolution of up to 4800 x 600 optimized dpi.
- Print speed of up to 8 ipm (impressions per minute) for black and 4 ipm for color prints.
- Scan resolution of 600 x 1200 dpi.
- Auto Power button to switch the printer mode ON.
Printer Specification:
- Manufactured By:
- Model Number:
- Supported OS: Windows XP, Vista, 7, 8, 8.1, Server 2003, 2008 and MAC PCs
- Driver Type: Driver & Software Package
- Link Type: Direct
- USB Port: Yes
- Scan Feature: Yes
- Copy Feature: Yes
- Fax Feature: Yes
- Wireless Feature (Wi-Fi): Yes
This page includes step by step driver download & installation guide for Canon PIXMA E400 Driver Download for Windows 7, 8, 8.1, XP, vista 32 – 64 bit and for Mac PC.
FAQs
Q. How to Download Canon PIXMA E400 drivers for Windows vista?
A. Scroll up and you will get the download link for all the windows version. Please find out the vista operating system Download link button.
Q. I lost my Canon PIXMA E400 printer software disk which came with the printer. Now how do I reinstall Canon E400 printer on my computer?
A. To install your printer, you do not need any CD / DVD any more. Here we provide you the direct setup file link which would never need any CD disk. We have mentioned the drivers & software for Canon PIXMA 400 printer. Please scroll up and find out the download link as per your operating system.
Q. How do I install Canon E400 printer?
A. Download the setup file and double click on the downloaded file and follow the on-screen installation instructions. You can find the download Canon PIXMA E400 link on top of the page, please scroll up to download the file.
FAQs

Q: i require the driver for windows 10 to install my canon pixma e400 printer
A: Click here to download Windows 10 driver
Q: How to connect pixma e400 by mobile
A: If your phone have Android operating system, so please install this Canon app to set up canon pixma e400 printer on your phone.


When I want to scan tells me that you need a WIA driver to use the device.
It means, your scanner driver is not installed properly. We suggest you to reinstall the driver. Here’s the driver download link: https://gdlp01.c-wss.com/gds/5/0100005775/02/win-e400-1_1-acd.exe. If this doesn’t work then you’ll require its basic driver then you’ll have to install it manually. Please let us know we’ll provide you its scanner basic driver.
Printer canon pixma E 400 is not connecting to the mobile.
You can use canon app to set-up on android based mobiles.