
When you upgrade the operating system of your computer you should simultaneously upgrade its printer driver. In this driver download guide, you will get the latest Kyocera TASKalfa 1800 driver package download links for various operating systems along with their installation instructions. Let’s see how and where to download the driver.
On this page, you will find Kyocera TASKalfa 1800 GX driver download links for Windows 11, 10, 8, 8.1, 7, Vista, XP (32bit / 64bit), Server 2000 to 2025, Linux, Ubuntu, and Mac 10.x, 11.x, 12.x, 13.x, 14.x, 15.x, 26.x operating systems. Since all the drivers given below are official Kyocera drivers, you can safely use them as a replacement for Kyocera TASKalfa 1800 software CD drivers.
Index:
Kyocera TASKalfa 1800 Driver Download
Out of all the operating system versions given on our list, choose your preferred operating system and use its download button to get your Kyocera TASKalfa 1800 (LT19565243) driver setup file.
Driver Download Links
| Driver Description | Download Link |
| Kyocera TASKalfa 1800 GX driver for Windows XP, Vista, Windows 7, Windows 8, Windows 8.1 (32bit / 64bit) | Printer Driver / Scanner Driver |
| Kyocera TASKalfa 1800 driver for Windows 10, Windows 11 (32bit / 64bit) | Printer Driver / Scanner Driver |
| Kyocera TASKalfa 1800 driver for Microsoft Server 2003, Server 2008, Server 2012, Server 2016, 2019, 2022, 2025 (32bit / 64bit) | Printer Driver / Scanner Driver |
| Kyocera TASKalfa 1800 driver for Mac OS X 10.5 to 10.15, 11.x, 12.x, 13.x , 14.x, 15.x, 26.x | Download |
| Kyocera TASKalfa 1800 driver for Linux and Ubuntu | Printer Driver / Scanner Driver |
| OR | |
| Download the driver directly from the Kyocera TASKalfa 1800 official website. | |
Note: If the above given driver doesn’t work then kindly report here.
Driver Compatiblity:
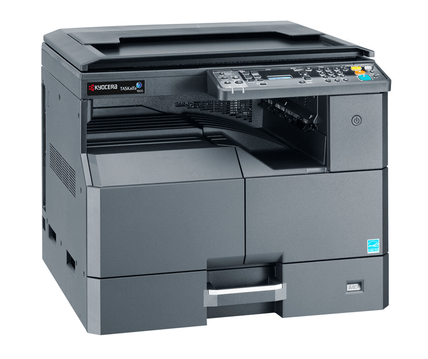
The Kyocera TASKalfa 1800 all-in-one is designed for office work, therefore, it’s important that this machine delivers its top performance all the time. For this reason, we would recommend installing the full feature Kyocera TASKalfa 1800 driver on your computer as it will ensure that your printer will run on the drivers and applications that were specifically designed by Kyocera for this machine.
Supported OS:
- Windows XP to Windows 11 (32bit / 64-bit)
- Microsoft Server 2000 to Server 2022 (32bit / 64-bit)
- Mac OS X v10.0 to 10.15, 11.x, 12.x, 13.x Ventura
- Linux & Ubuntu
How to Install Kyocera Taskalfa 1800 Printer Driver
Right installation of a printer driver is important for the proper functioning of your printer. Therefore, you must attentively study our printer driver installation guide given below and follow its installation instructions properly.
The following installation steps will describe the installation process for the Kyocera Taskalfa 1800 INF printer driver on Windows 10 operating systems. Installation steps are easy to follow and you should use the same steps for other Windows OS as well.
Video:
Video Tutorial to learn how to install Kyocera taskalfa 1800 printer on Windows OS manually using its basic INF drivers:
Steps:
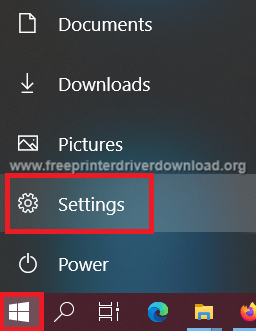
- Click ‘Start’ button and choose ‘Settings’ icon.
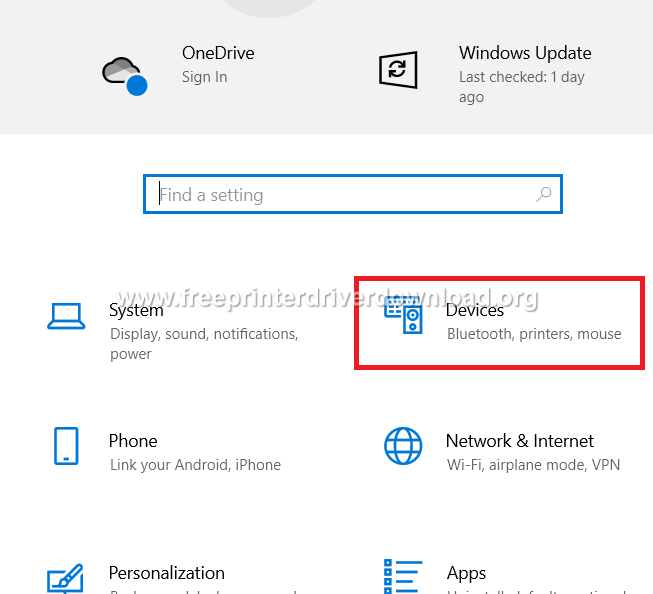
- On the Settings page, select ‘Devices’ option.
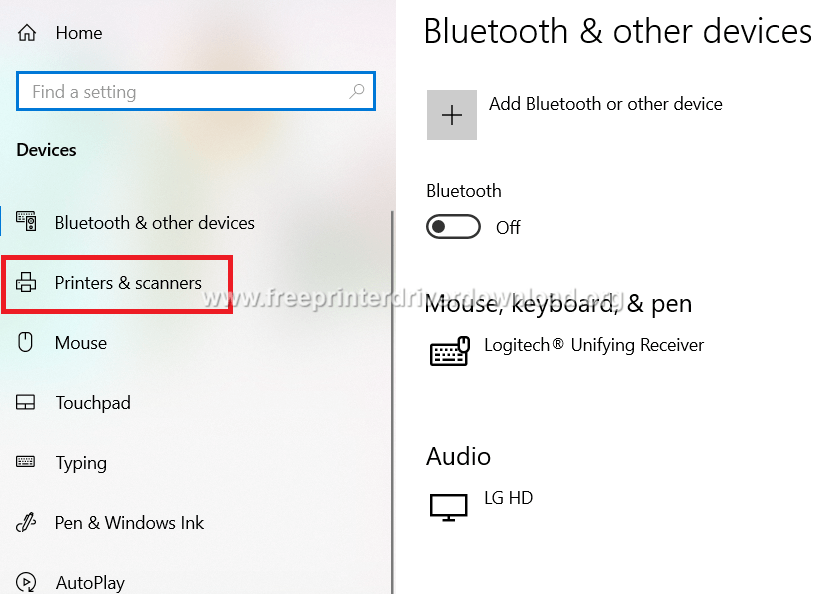
- Choose ‘Printers & scanners’ on the Devices side bar.
- Click on the ‘Plus’ sign in front of the ‘Add a printer or scanner’ option.

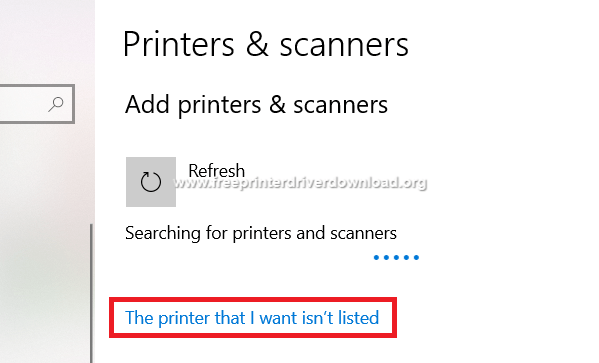
- Choose the link ‘The printer that I want isn’t listed’.
- In the ‘Add Printer’ wizard, choose the option ‘Add a local printer or network printer with manual settings’. Click ‘Next’ to continue.

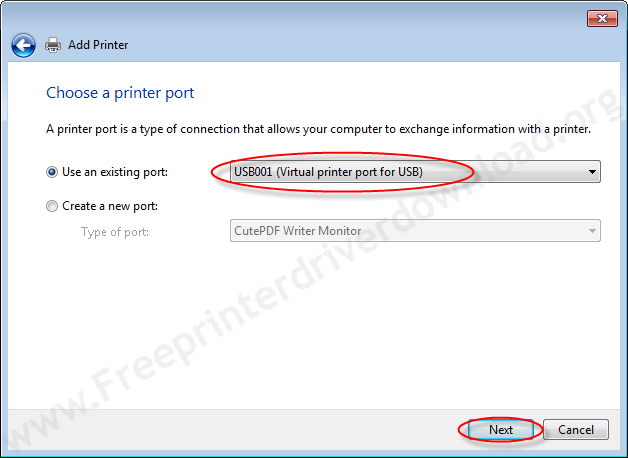
- In the Choose a printer port window, click on the ‘Down’ arrow in front of the ‘Use an existing port’ option to view the list of ports available. From that list, choose port USB001, 002, 003 then click on ‘Next’ to continue.
- Click ‘Have Disk’ button to start the driver installation process.
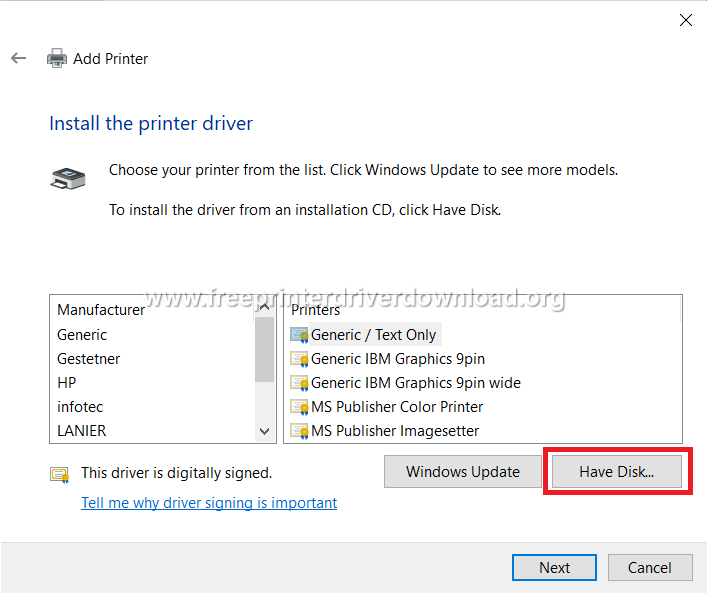
- Click the ‘Browse’ button to open the Browse window and locate the folder where you have extracted the Kyocera Taskalfa 1800 INF printer driver.


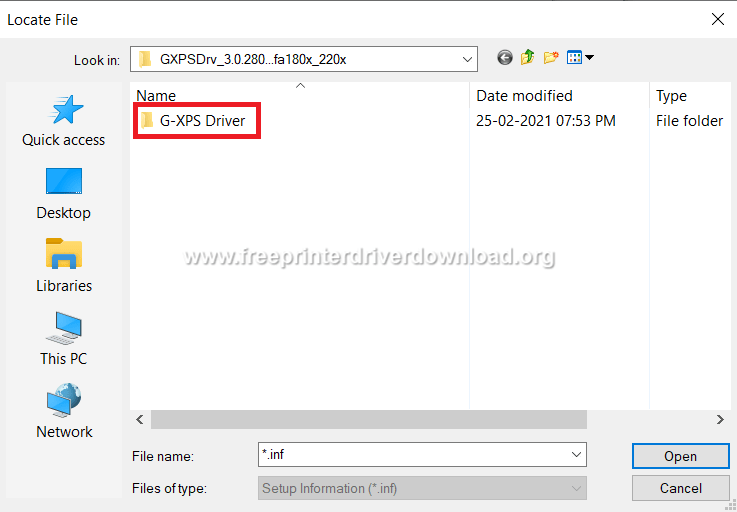
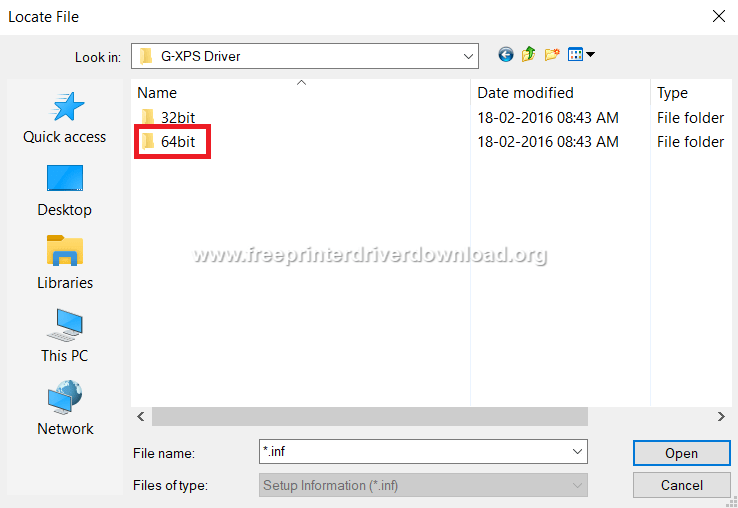
- Double click ‘G-XPS Driver’ folder.
- Double click ‘64bit’ folder.
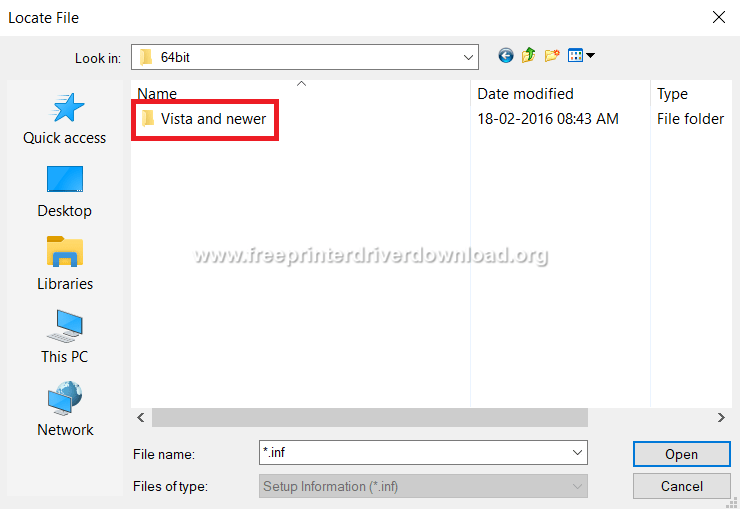
- Double click ‘Vista and newer’ folder.
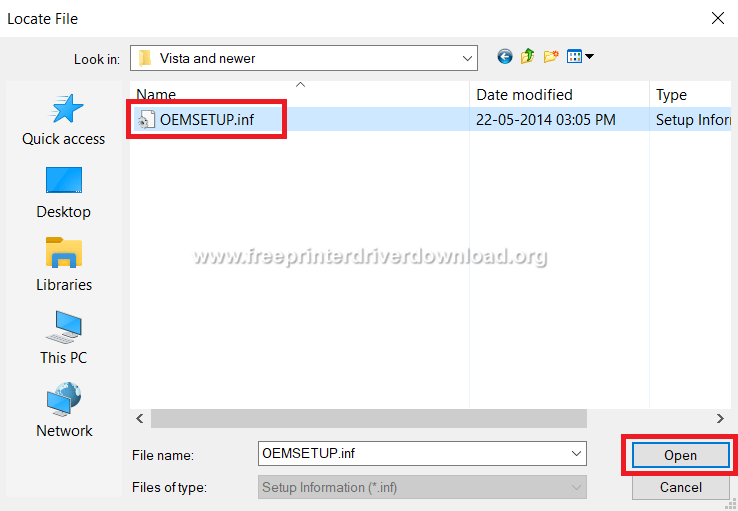
- Select the .inf file and click on ‘Open’.
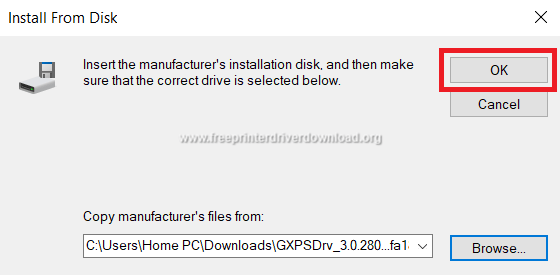
- Click ‘OK’ to proceed.
- From the list of printers, select ‘Kyocera TASKalfa 1800 GX (XPS)’, then click ‘Next’ to proceed.

- In this Window you can change the default name of the printer or leave it unchanged. We have left it unchanged. Then, click ‘Next’ to continue.

- Wait for the printer driver to install.

- If you want to share your printer over the network, then you can choose that option and provide the necessary details. Otherwise, choose ‘Do not share this printer’ option and click ‘Next’.

- You have successfully installed your Kyocera printer driver. You can click on ‘Print a test page’ to check your printer. Finally, click ‘Finish’ to complete the driver installation.

How to Install Kyocera Taskalfa 1800 Scanner Driver
Here, we will describe the installation process for the Kyocera Taskalfa 1800 INF scanner driver. Our installation steps are for Windows 10 OS, but you can follow the same steps for other Windows OS as well.
- Select ‘Start’ button and click on ‘Settings’.
- On the Settings page, choose ‘Devices’ option.
- Select ‘Printers & scanners’ on the Devices side bar.
- Press the ‘Plus’ icon on front of ‘Add a printer or scanner’ option.
- Click the link ‘The printer that I want isn’t listed’.
- In the ‘Add Printer’ window, click ‘Add a local printer or network printer with manual settings’ option, then choose ‘Next’ to proceed.
- Choose a printer port window will appear, click the ‘Down’ arrow on the front of the ‘Use an existing port’ option to view the list of available ports. Select the port where you want to install your Kyocera scanner, then click on ‘Next’.
- Choose ‘Have Disk’ button.
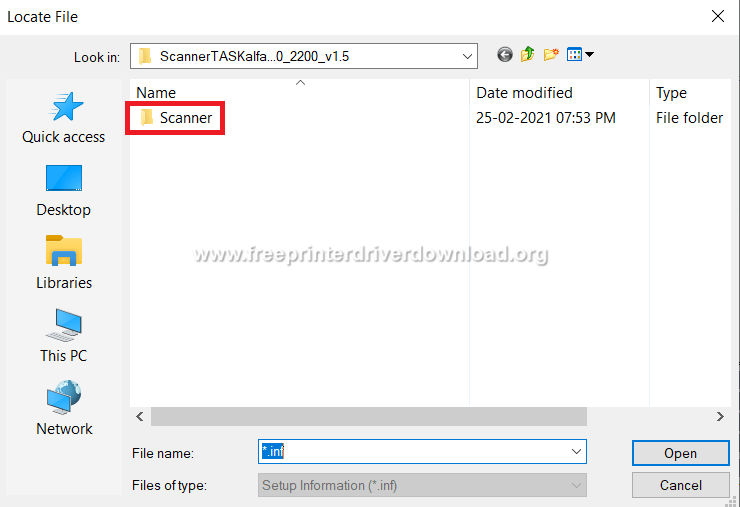
- Click ‘Browse’ button to open the Browse window and locate the folder where you have extracted the Kyocera Taskalfa 1800 INF scanner driver.
- Double click the ‘Scanner’ folder.
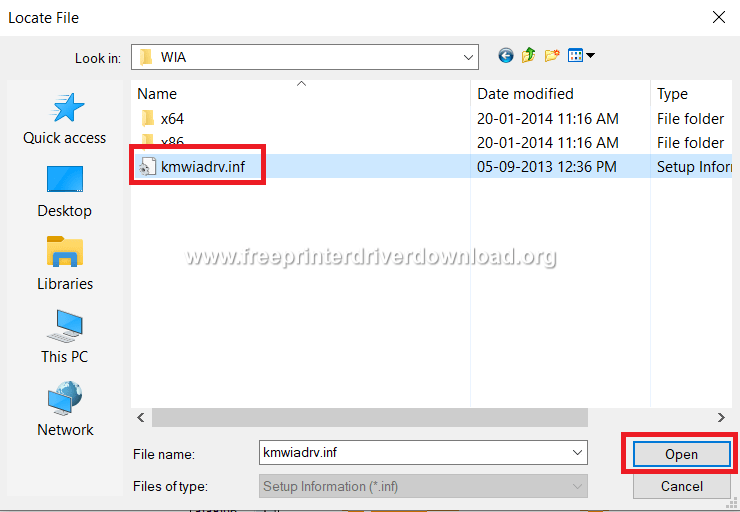
- Double-click the driver folder you want to install. We have chosen ‘WIA’ driver folder.

- Choose the .inf file and click ‘Open’ button.
- Choose ‘OK’ to start the driver installation.

- Follow the prompts to complete the scanner driver installation and click ‘Finish’ when the installation is completed.
Specification
- Functions: Print, Scan, Copy, Fax
- Print Method: Semiconductor Laser
- Print Speed: up to 18 ppm
- Media Size: A3, A4, A5, A6
- Display: 2 line LCD
- Duplex Printing: Yes
- Connectivity: USB
Toner Cartridge Details: This Kyocera laser printer uses one Black (RETK4105) toner cartridge.


i am using linux OS kindly help to install drivers of 1800 taskalfa.
Have you tried this: Download printer driver / Download scanner driver.
If you have not tried it yet then please try it.
I HAVE TRIED INSTALLING THE SCANNER DRIVERS IN MY COMPUTER YET EACH TIME IT SAYS IT IS NOT COMPATIBLE
What operating system are you using?
Try to install it using Windows compatibility mode: https://www.freeprinterdriverdownload.org/how-to-install-printer-driver-in-compatibility-mode-on-windows-10/
im not able to print from my laptop , its saying that MS word not print ,please solve this issue
Make sure there are no print jobs that are stuck in the queue. Clear the print job queue. After that, make sure you can print from another software link notepad, pdf, and photos from your computer. If the problem is in the MS word, then you can fix it by following the below given article’s steps: https://www.freeprintersupport.com/how-to-fix-windows-cannot-print-due-to-a-problem-with-the-current-printer-setup-error-message/
I am not able to installed printer driver of Taskalfa 1800. When i downloaded the file from the website, there is no septup file application. Please help me out with this issue.
This is a basic driver. As it is a basic driver, you’ll have to install it manually. Here’s the guide to install it manually:
https://www.freeprinterdriverdownload.org/how-to-install-a-printer-driver-manually-through-usb-add-a-printer-method/