
Canon ImageClass LBP7780CDN Driver Download
If you’re trying to download the latest Canon ImageClass LBP7780CDN Driver and you want to make sure it’s from a reliable website, make sure to go to “https://www.canon-europe.com/support/“. Type your printer model in the search box, click on the search result displayed, and then go to Drivers & Software.
Here you’ll be able to download the driver you need based on your operating system. However, if that’s too complicated for you, you can just go to the download section below and start downloading it immediately by clicking the download link. (It would also be a direct download link, we have mentioned it because you don’t face any difficulty downloading drivers). Together, we have also mentioned the steep by step installation guide for this driver, please also check out the installation guide if you have any difficulty.
- Canon ImageClass LBP7780CDN Driver Download
- How to Download Drivers
- Follow the following Instructions to download the drivers.
- Step1: First, get the operating system info before download the drivers
- Step2: Download the drivers here
- Canon ImageClass LBP7780CDN Driver Download Links
- Learn more about Canon ImageClass LBP7780CDN printer Description
- Learn more about the Canon ImageClass LBP7780CDN Features
- Some of the printer’s main features include:
- Learn more about Canon ImageClass LBP7780CDN Specifications
- Know about Canon ImageClass LBP7780CDN I Toner Cartridge
- To Install Drivers:
- Follow the following Instructions to install printer
- To install drivers through CD:
- Install the drivers for the Canon ImageClass LBP7780CDN printer using a CD wizard:
- To install drivers without CD:
- Install the drivers for the Canon ImageClass LBP7780CDN printer an Installation package:
- Method1: to download driver
- Method2: to download driver
- Then follow the below given instructions to install Canon ImageClass LBP7780CDN driver
- To install drivers manually:
- Install the drivers for the Canon ImageClass LBP7780CDN printer through “Add a printer” (Manually):

How to Download Drivers
Follow the following Instructions to download the drivers.
Step1: First, get the operating system info before download the drivers
Before download drivers you need to have the info about your operating system so that you can get download drivers according to your operating system.
- Get the “Operating system” and “System Architecture (system type)“.
If you don’t know what to do, click here to find out how to find “operating system” and “system type” in computer.
Step2: Download the drivers here
We have listed all the latest drivers for Canon ImageClass LBP7780CDN series printer here.
- Below, you can choose your “operating system” and “System Architecture” and then click on their Download link to download drivers.
- Click on the download link and choose where you want to download it on your computer.
- Click Save and wait until the download is complete.
Canon ImageClass LBP7780CDN Driver Download Links
Learn more about Canon ImageClass LBP7780CDN printer Description
The Canon ImageClass LBP7780CDN can produce vibrant looking materials at very fast speeds, so no matter if you need a few color pages printed fast, you can definitely rely on it to do that for you. The model features an expandable and quite large paper capacity, but also high yield replacement cartridges and automatic duplex printing that make using it a joy.
In terms of compatibility, the printer is compatible with the Canon Mobile Printing application which means that it allows you to print a wide range of file types, including images and web pages directly from your mobile device. On top of that, it also comes with features such as Direct Print that makes it easy for you to print XPS, TIFF, JPEG and PDF files directly from a USB device.
Learn more about the Canon ImageClass LBP7780CDN Features
Some of the printer’s main features include:
- Extremely fast printing speeds of up to 33ppm.
- Quick First Print allows both color and black & white first time in less than ten and a half seconds.
- Comes with a 100 sheet multipurpose tray and a 500 sheet front loading cassette.
Learn more about Canon ImageClass LBP7780CDN Specifications
Canon ImageClass has some pretty impressive specs that make it stand out easily with some of them including:
- The black high yield cartridge allows you to print approximately 12 thousand pages.
- Print up to 64 hundred color pages thanks to the high capacity color cartridge.
- Energy saving mode.
- Automatic duplex printing mode lowers energy costs and minimizes paper consumption.
Know about Canon ImageClass LBP7780CDN I Toner Cartridge
The LBP7780CDN uses a high-yield toner, which means that a single cartridge is going to last you for a very long time. In fact, with the black cartridge you can print about 12000 pages while the color cartridge allows you to print about 6400 pages.
To Install Drivers:
Follow the following Instructions to install printer
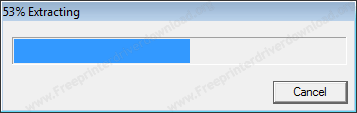
- Double click on the Driver package of your choice after it’s downloaded. The installation will extract the files required to begin.

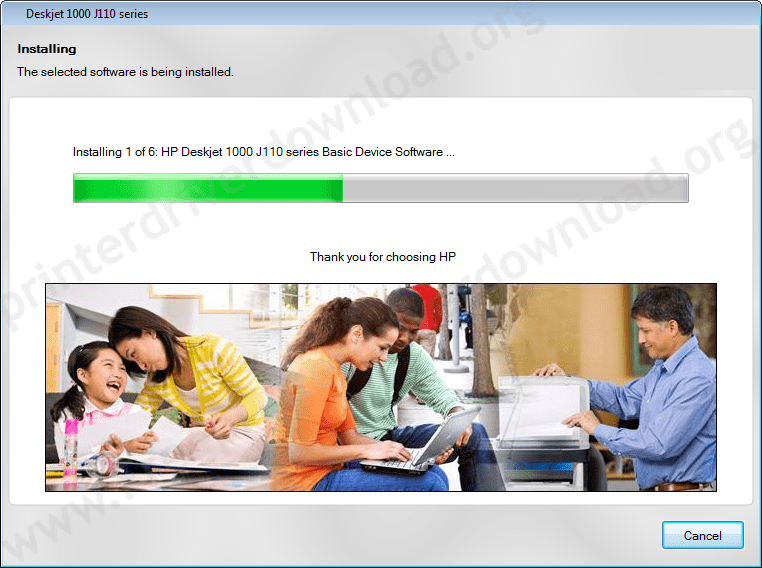
- The installation will now begin, so walk the Wizard prompts to install the drivers.

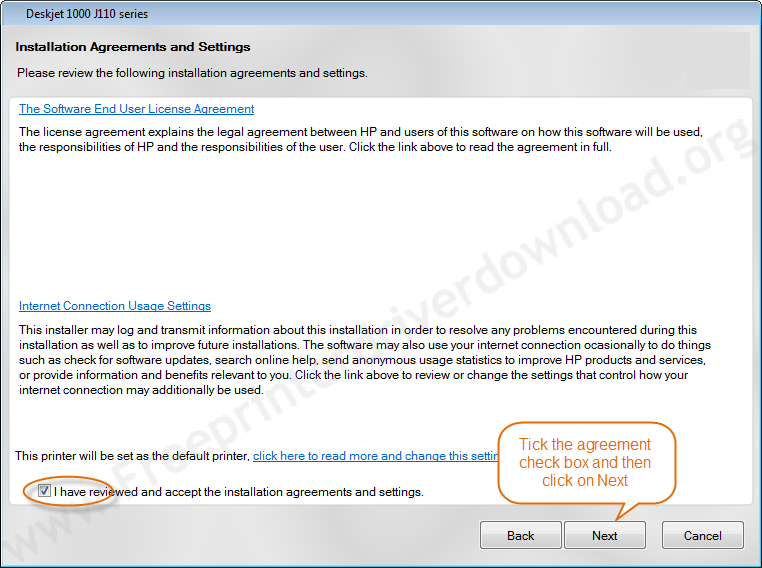
- Accept the Installation agreements.

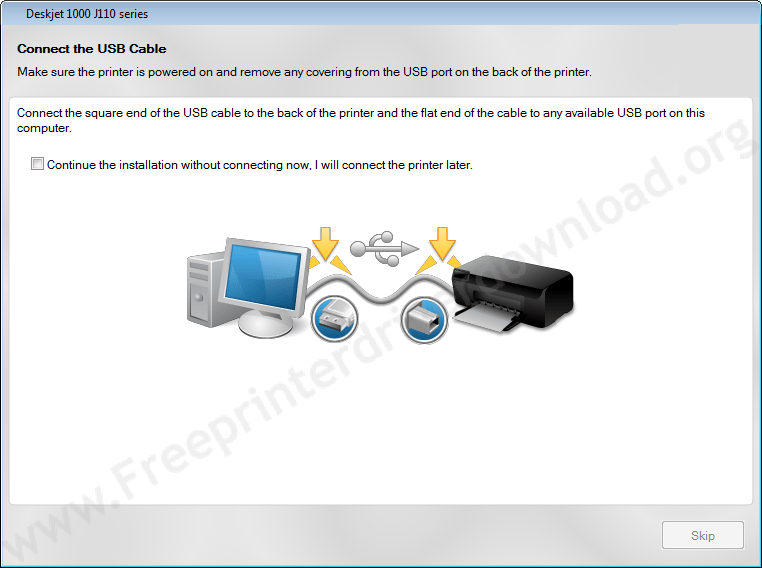
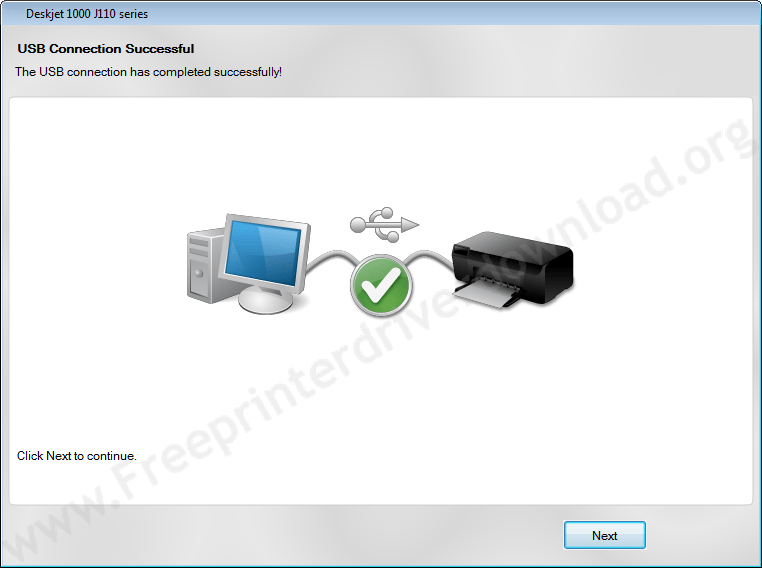
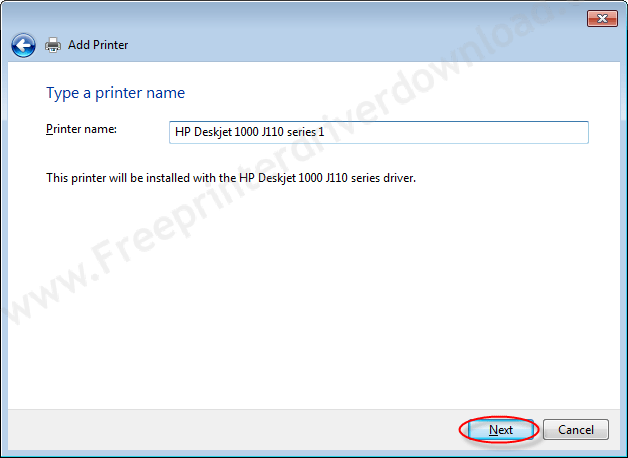
- Connect your printer to your computer when prompted to do so. (See below screenshot)
- Wait until detecting your printer.

- Click on Next, now your printer is detected here if you get green tick mark.
- Click on Finish to complete installation.
To install drivers through CD:
Install the drivers for the Canon ImageClass LBP7780CDN printer using a CD wizard:
- Turn on the printer by pressing the power button on it.
- Load the driver CD that came with your printer into your computer’s CD drive.
- The AutoPlay window will popup and prompt you to Install or run program from your media.
- Click on Run or execute the file named as Autorun.exe.
- Windows will ask you if you want to open the installer at which point you should click on Yes.
- Before the installation can continue, you need to review the agreements and then click on the checkbox next to “I have reviewed and accept the installation agreement“.
- You’ll now be promoted to click Next to begin installing the Canon ImageClass LBP7780CDN printer drivers. The Installer will copy files from the CD and transfer them to your computer.
- A menu with a few choices will appear, so make sure you choose the way you want to connect the printer to your computer.
- Choose to either connect it through a wireless network, a wired network or using a USB cable.
- A window will then appear asking that you connect one end of the USB cable into your printer and the other into your laptop/computer.
- Your computer will find the printer (automatically) and then continue/next with the installation.
- Once the installation is complete, the installer will notify you about it.
- A window will appear saying the software was successfully installed, Click Finish.
To install drivers without CD:
Install the drivers for the Canon ImageClass LBP7780CDN printer an Installation package:
You can install printer drivers even if you have lost your printer drivers CD. This is the method that you can install Canon ImageClass LBP7780CDN printer without CD (disc).
Method1: to download driver
- Go to Canon ImageClass LBP7780CDN official website and click on Download drivers button.
- Enter your printer name in the Find my product box.
- A series of results will appear, so make sure you select your specific printer model by clicking on it
- Choose your operating system that matches your version of Windows.
- Choose either the Basic Driver or Full Feature Driver. The Basic Driver package includes all the basic files required to use the printer. The Full Feature package includes extra software, such as maintenance programs, utilities and even photo editing apps.
Method2: to download driver
- You can download driver directly: Driver Download links are also given on the this page, you can download it from here directly. Scroll above and find out the driver download link.
Then follow the below given instructions to install Canon ImageClass LBP7780CDN driver
- Click on the driver package and choose where you want to download it on your computer.
- Click Save and wait until the download is complete.
- Double click on the Driver package of your choice after it’s downloaded. The installation will extract the files required to begin.
- The installation will now begin, so walk the Wizard prompts to install the drivers.
- Accept Installation agreements.
- Connect your printer to your computer when prompted to do so.
- Click Finish to finish installing the drivers.
To install drivers manually:
Install the drivers for the Canon ImageClass LBP7780CDN printer through “Add a printer” (Manually):
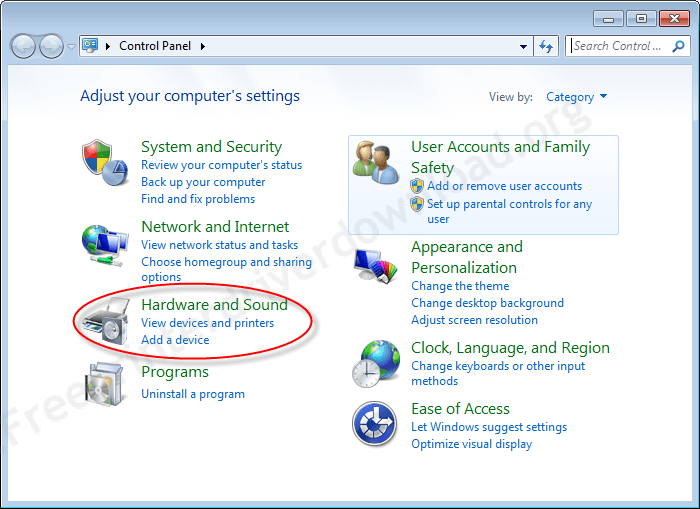
- Go to Start, Locate Control Panel on the right and click on it.

- Go to Hardware and Sound.
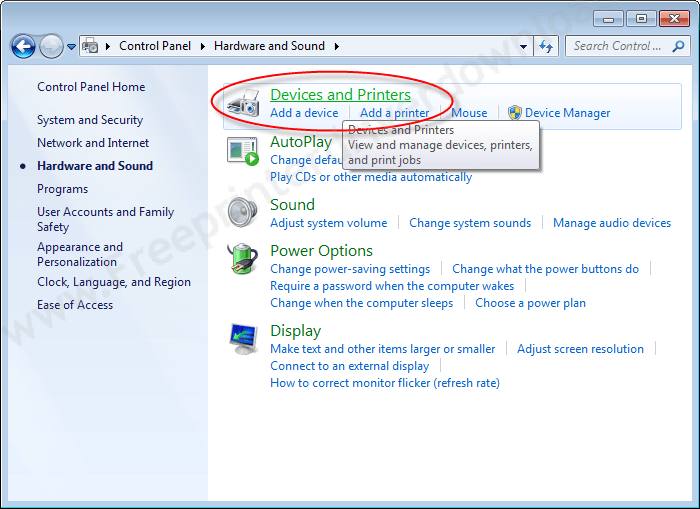
- Under Devices and Printers, click on Add printer.
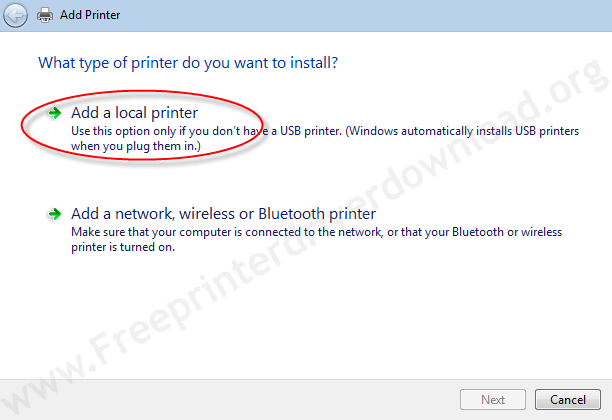
- Choose Add a local printer if you don’t have a USB printer listed in the list. That’s because Windows installs USB printers automatically as you plug them in.

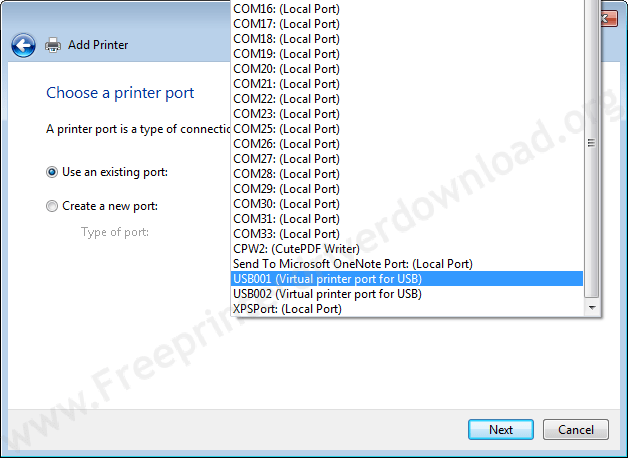
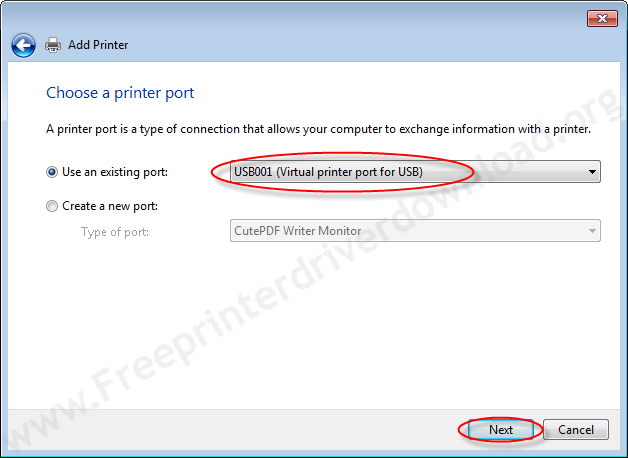
- Choose a port for your printer.
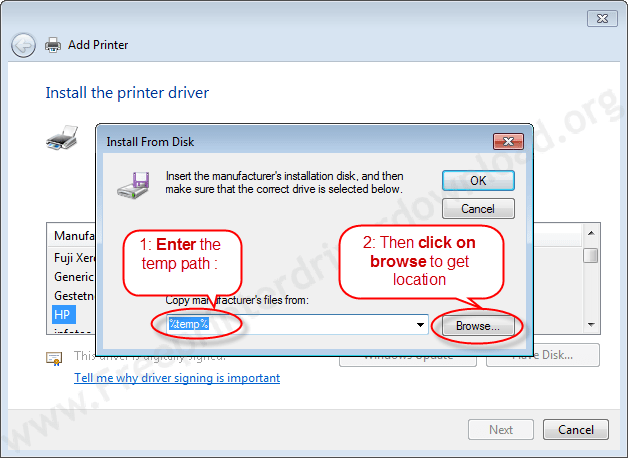
- Choose your printer from the list (including brand and model) and click Next. If you don’t find your printer drivers in this default list then you have to download drivers first and then extract them to temp folder then give that temp folder path in this “add a printer” installation wizard. click on have disk to choose driver manually from their extracted location.

- Extract the printer drivers. Usually, drivers are automatically extract into temp folder path: %temp%. Some drivers are automatically extract in C drive or another path, it depends on the printer brand.
- This printer package extracting the driver’s file in temp folder. Usually, it extracts in temp folder.
- After click on “Have disk“, type “%temp%” in path field and then click on “browse“
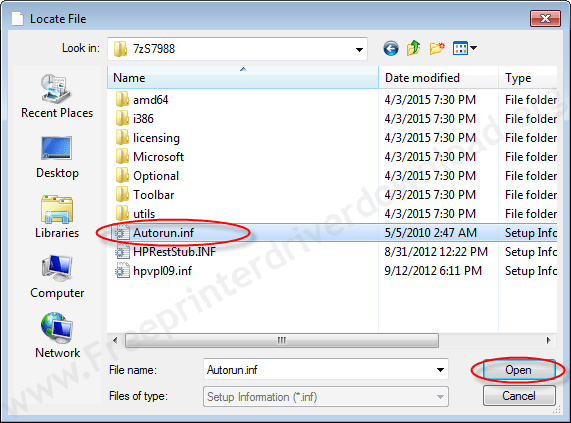
- Browse will bring you in temp folder. Here, choose the package extracted folder and open it.
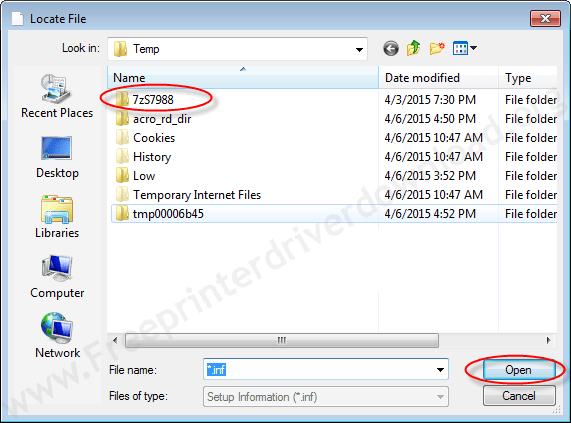
- Now choose the file named as “Autorun.inf” and open it. This file name may be vary, but the extension would be the same “.inf“.
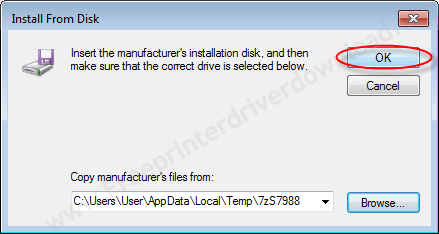
- After click on “Open”, you will bring back to “Install from disk” menu with full path. Now, Click on OK to get drivers.
- Now, Click on NEXT

- If you get below screen, then you have to choose the second option (replace the current driver)
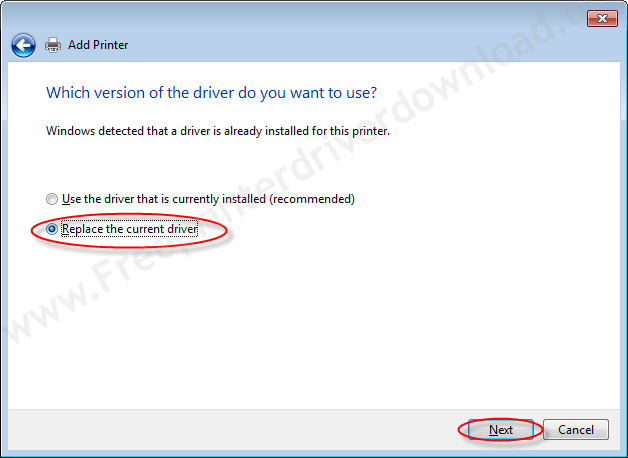
- Click on Next
- Choose the option as per your requirement that you would like to share your printer to another computer or not. Then click on NEXT.

- Choose the option that “set your printer as default” and then click Finish.


Please cannot find the software for this printer. help me please.
CANON I – SENSYS LBP7750CDN.
Try this: https://gdlp01.c-wss.com/gds/0/0100008280/01/UFRII_Driver_V1500_32_64_EN_02.exe